Forest City Audit Photo Requirements
Read through these instructions and take photos of all components for all HVAC and METER audits.
The following list of pictures should be taken for each Site Audit.
The specified labels, as listed below, should be used and included within each picture.
In order to include the proper ‘Labeling’ within each picture, please gather the following materials, and follow these instructions on how to properly display them.
- Print the pages from the Picture Survey Helper documents that you received in your Auditor Package.
- Purchase heavyweight clear sheet protector, Wet Erase Markers, Cardboard Backer and a 20# Magnet
- Insert both sheets (printed side out), separated by a cardboard backer into the sheet protector.
- Top uses;
- Quick reference (left hand side) for the equipment label
- Back side has the minimum picture requirements (you can take more – it’s recommended)
- Prop it on top of a thermostat before taking the picture
- Using the magnet, stick it to the chiller, boiler, electrical panel, or time clock, etc.…
- Write the Building ID, and equipment label, take a picture of the equipment with the sheet included in the photos.
All pictures shall be clear and text shall be legible.
All pictures shall include the equipment label and Building ID
Conditional Pictures – these are pictures that words cannot describe, these are pictures that help describe the current condition of the property or equipment.
Do ones best to keep pictures grouped (Thermostats, Rooftop Equipment, Control Panels, Lighting, etc.). It is understood that this will not always be possible, however we ask for good faith efforts, thank you, and remember, a picture can save a costly return trip back.
Naming Standards for Labels:
Use the following tagging schema when the equipment is not labeled replacing the ** with the sequence number i.e. 01, 02, 03, 10, 20, 50, up to 99.
Air Handler Unit use: AHU**
Building ID Use: BldgID-
Chiller use: CH**
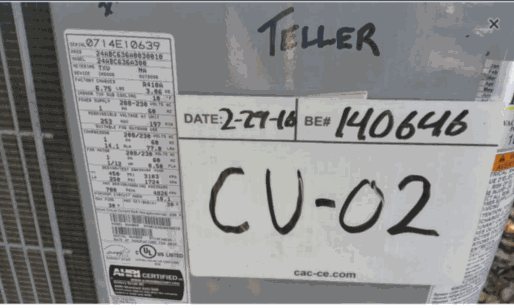
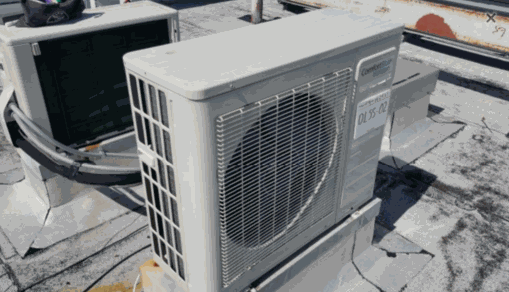
Condensing Unit use: CU**
Control Panel use: CP**
Electric Duct Heater use: EDH**
Electrical Panel use: EP**
Fan Coil Unit use: FCU**
Gas Heaters use: GH**
House Elec. Disconnect use: HED**
Main Distribution Panel use: MDP**
Rooftop Units use: RTU**
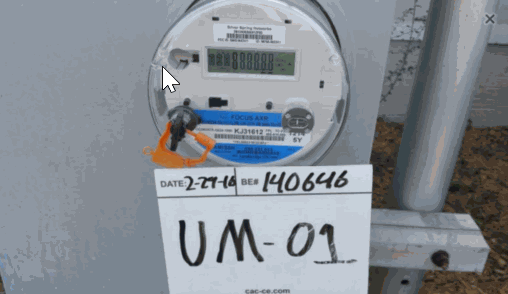
Utility Meter use: UM**
Gas Meter use: GM**
Water Meter use: WM**
Example Photos:
.
Required Photos:
Unit nameplate:
Control panel:
Standing back from a corner of the unit, showing two sides of the equipment:
Diagonally opposite corner, 6 Ft back, showing both sides of the equipment:
Ductless Split Systems;
Outdoor Unit Nameplate:
Standing back 6 Ft, the front of the indoor unit:
Standing back 6 Ft, the outdoor coil:
Electric Duct Heaters;
Unit Nameplate:
Control Compartment:
Gas Heaters;
Unit Nameplate:
Control Compartment:
Package Units;
Unit Nameplate:
Control Compartment:
Standing back 6 Ft, corner of the unit, showing condenser coil & both sides of the unit:
Diagonally opposite corner, 6 Ft back, showing both sides of the unit:
PTAC (Hotel Type);
Unit Nameplate:
Standing back 6 Ft, the front of the unit:
Standing back 6 Ft, the outdoor coil:
Split Systems (Outdoor Unit);
Outdoor Unit Nameplate:
Outdoor Unit Control Compartment:
Outdoor Unit Standing back 6 Ft
Split Systems (Indoor Units);
Indoor Unit Nameplate:
Indoor Unit Control Compartment:
Indoor Unit Standing back 6 Ft:
VAV (variable Air Volume Units);
VAV Picture:
The actuator and linkage controlling the damper:
VAV Nameplate Picture:
Window Units;
Unit Nameplate:
Standing back 6 Ft, the front of the unit:
Standing back 6 Ft, the outdoor coil:
Thermostats: (Labels shall use the equipment identifier)
Before touching the thermostat:
1. standing back 6 feet and take a picture:
2.Expose the thermostat Subbase and take a picture:
Meter Audit:
Electrical Disconnect between utility feed and the building distribution panel (House Elec. Disconnect);
Take a picture standing back 6 Ft or more capturing all the installed electrical gear:
Electric Panels (those panels identified in the meter survey form);
Standing back 5 Ft and no more than 10 Ft take a picture showing the entire panel:
Panel face off, stand back 5 Ft and no more than 10 Ft take a picture showing the entire panel:
Panel schedule:
Utility Meter:
Standing back 2 Ft and no more than 5 Ft take a picture of the utility meter faceplate:
Gas Meter:
Standing back 2 Ft and no more than 5 Ft take a picture of the gas meter faceplate:
Water Meter:
Standing back 2 Ft and no more than 5 Ft take a picture of the water meter faceplate: